上次有發了一篇關於junit的基本JUnit4 教學
當然~如果只是這麼簡單的東西~只是上網google一下就好
網號上也有很多JUnit4+Sprin教學
但如果你的資料庫的連線方式為jndi的話
絕大多數的網站都是會叫你把連線方式改成jdbc的
但是討厭鬼這邊不用呀~~~~
在開始前如果還沒有配置好spring架構的話可以先參考下例文章
Struts2 架構配置教學、Struts2+Spring架構配置教學(Spring)、Struts2+Spring+Hibernate架構配置教學(Hibernate)上、Struts2+Spring+Hibernate架構配置教學(Hibernate+JNDI)下
還要再加入一個jar
org.springframework.test-3.1.1.RELEASE.jar
用好之前就直接看範例了
package junit;
import javax.annotation.Resource;
import javax.naming.NamingException;
import nerdy.action.LeatherAction;
import org.junit.Assert;
import org.junit.BeforeClass;
import org.junit.Test;
import org.junit.runner.RunWith;
import org.springframework.jdbc.datasource.DriverManagerDataSource;
import org.springframework.mock.jndi.SimpleNamingContextBuilder;
import org.springframework.test.context.ContextConfiguration;
import org.springframework.test.context.junit4.SpringJUnit4ClassRunner;
import org.springframework.test.context.transaction.TransactionConfiguration;
@RunWith(SpringJUnit4ClassRunner.class)
@ContextConfiguration(locations = { "classpath:/config/action-context.xml",
"classpath:/config/service-context.xml",
"classpath:/config/dao-context.xml" })
@TransactionConfiguration(transactionManager = "transactionManager", defaultRollback = true)
public class JunitTest {
@Resource
LeatherAction leatherAction;
@BeforeClass
public static void beforeClass() throws NamingException {
SimpleNamingContextBuilder builder = SimpleNamingContextBuilder
.emptyActivatedContextBuilder();
DriverManagerDataSource driverManagerDataSource = new DriverManagerDataSource();
driverManagerDataSource.setUrl("jdbc:mysql://192.168.1.105/leather");
driverManagerDataSource.setDriverClassName("com.mysql.jdbc.Driver");
driverManagerDataSource.setUsername("leather");
driverManagerDataSource.setPassword("123456");
builder.bind("java:comp/env/jdbc/leather", driverManagerDataSource);
}
@Test
public void test() {
Assert.assertEquals("success", leatherAction.index());
}
}
@RunWith(SpringJUnit4ClassRunner.class)才能使用spring的測式環境
@ContextConfiguration(locations = { })這邊是指定spring設定檔的路徑
@TransactionConfiguration(transactionManager = "", defaultRollback = )是看在spring裡有沒有設定transactionManager
若有的話再設定這行~沒有的話這行是可以不用的
若有的話還可以再設定執行完後要不要rollback
defaultRollback 為true則在test完的時候會rollback
false則會在test完後就commit
@BeforeClass
public static void beforeClass() throws NamingException {
SimpleNamingContextBuilder builder = SimpleNamingContextBuilder
.emptyActivatedContextBuilder();
DriverManagerDataSource driverManagerDataSource = new DriverManagerDataSource();
driverManagerDataSource.setUrl("jdbc:mysql://192.168.1.105/leather");
driverManagerDataSource.setDriverClassName("com.mysql.jdbc.Driver");
driverManagerDataSource.setUsername("leather");
driverManagerDataSource.setPassword("123456");
builder.bind("java:comp/env/jdbc/leather", driverManagerDataSource);
}
而上面這一段若是連線方式為jndi時再加
因為在使用jndi時是没有Java EE環境的,因此spring找不到JNDI所需的變數
所以要自己模擬一個JNDI所需的變數~
若是使用jdbc連線者就可以不用加
再來就是使用自動化測式
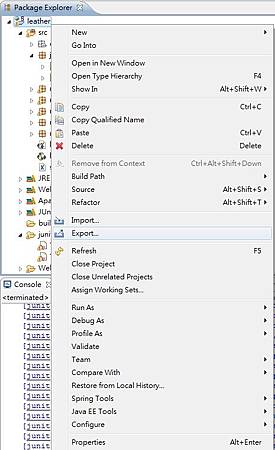
先對專案按右鍵點選Export
選擇Ant Buildfiles點next
將專案打勾點finish
就會出現一個build.xml
將它打開
找到<target name="xxxxxx"> 你的junit test的class名稱
以討厭鬼來說是~<target name="JunitTest">
將JunitTest 改成 AllTest 如下~
<target name="AllTest">
<mkdir dir="${junit.output.dir}"/>
<junit fork="yes" printsummary="withOutAndErr">
<formatter type="xml"/>
<test name="junit.JunitTest" todir="${junit.output.dir}"/>
<classpath refid="leather.classpath"/>
</junit>
</target>
如果以後有新的junit test的class的話~再自己手動加入,如下
<target name="AllTest">
<mkdir dir="${junit.output.dir}"/>
<junit fork="yes" printsummary="withOutAndErr">
<formatter type="xml"/>
<test name="junit.JunitTest" todir="${junit.output.dir}"/>
<test name=xxxxx.XXXXXX" todir="${junit.output.dir}"/>
<classpath refid="leather.classpath"/>
</junit>
</target>
再回到build.xml的最上方將default="build改為default="AllTest"
再對build.xml按右鍵Run As > Ant Build
執行完了以後再對專案按右鍵Refresh
會出現一個junit的資料夾
裡面就會有個別junit test class的測試報告了~


 留言列表
留言列表
